photography of the Quabbin Region & beyond

Tundra Graphics

  • Home
  • Galleries
  • Blog
  • Bio
Home / Blog / 2019

Share
June 10, 2019

Mitigating Silver Mirroring Through Cross Polarization

Silver Mirroring. Documentation Photography, Mauro J. Mazzini 2011.

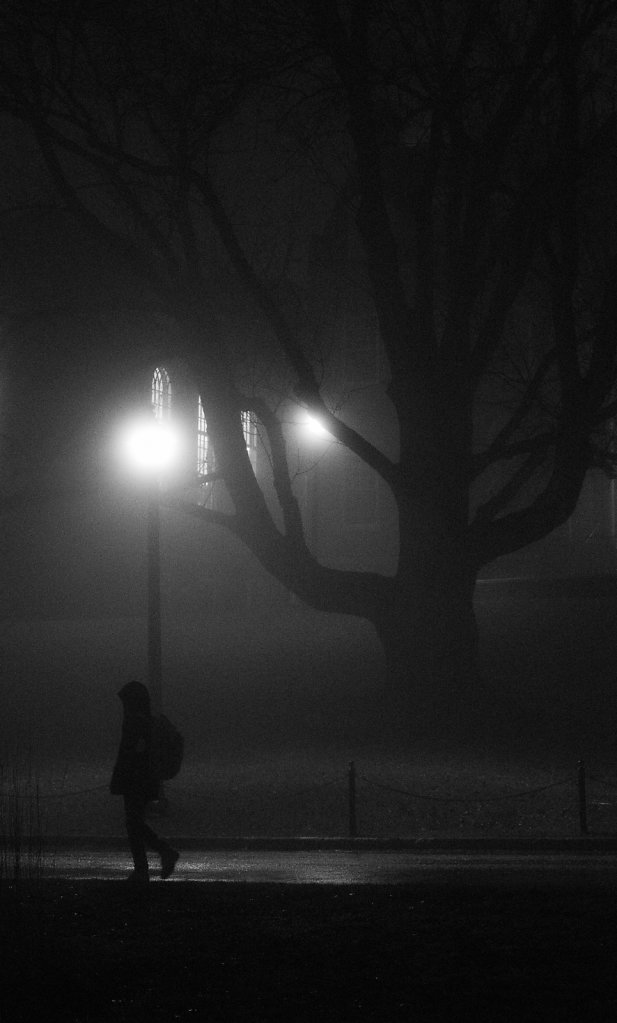
Silver mirroring is, according to the American Institute of Conservation, "a natural chemical process that affects photographic materials containing silver over time. It results in a metallic sheen over the surface of the photograph, typically affecting the darker areas of a photograph most." As can been seen in the silver gelatin print above, image details are obscured and overall spatial continuity is disrupted from highlight to shadow.

Colloquially known as silvering or silvering out, the phenomenon is commonly understood to be caused by silver in the print's binder initially oxidizing over time to silver ions. These ions can then migrate upward from the gelatin layer to the print's surface and subsequently transform to silver sulfide. A number of possible conservation treatments have been explored, including the use of saliva as a mild enzymatic solution applied by swab to the photograph's affected areas.

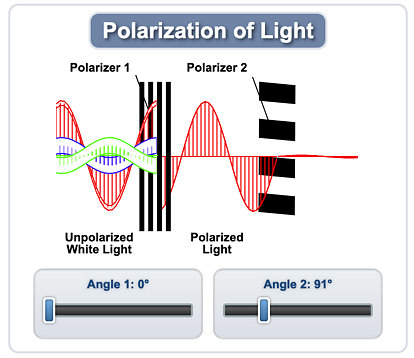
Digitizing prints of this type can be challenging. When illuminated, metals produce almost nothing but randomly-polarized (aka unpolarized) direct reflections. These type of direct reflections can cause the fogging effect associated with silver mirroring. However, because this property is consistent among metals certain studio lighting and filtering techniques can be employed to consistently improve the image quality of captured prints. One such method is cross polarization.

Cross polarization begins with managing the linearity of a polarized light source. In the case of copy photography, that normally begins with two lights on either side of a table that contains a scene to be shot.

Mounted Pair of Polarizer Sheets

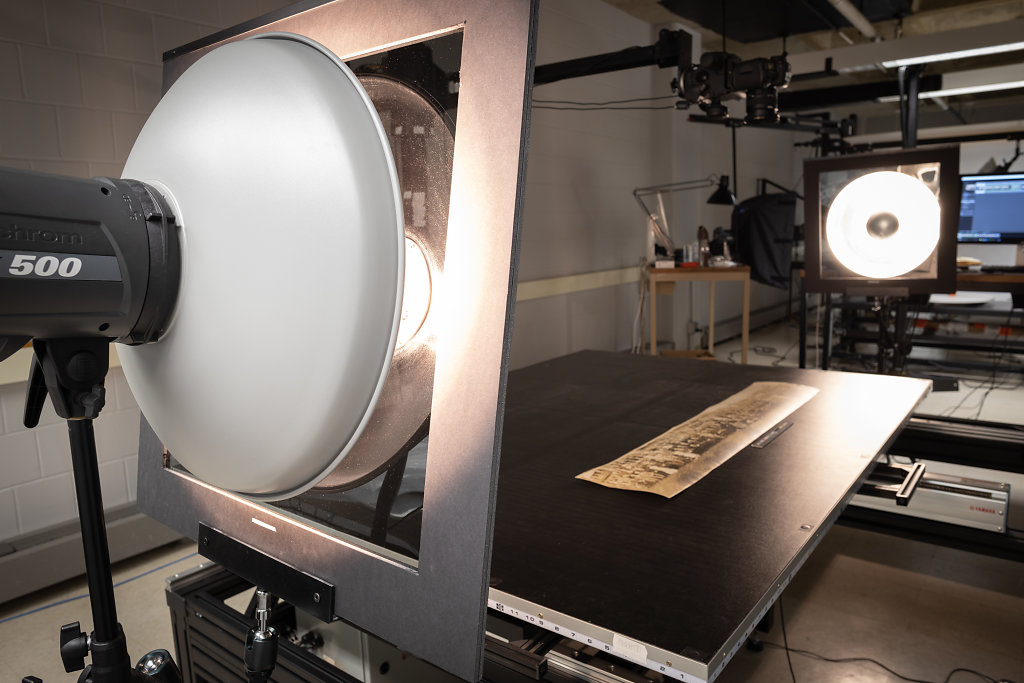
Here, mounted sheets of neutral gray linear polarizer film are positioned in front of two strobes that are part of the UConn Digital Imaging Lab's large automated X-Y table system. Once fired, the flash light that will eventually fall on the scene will be polarized according to the linearity of the film sheet in front of each head.

Polarizer Sheet Mounting

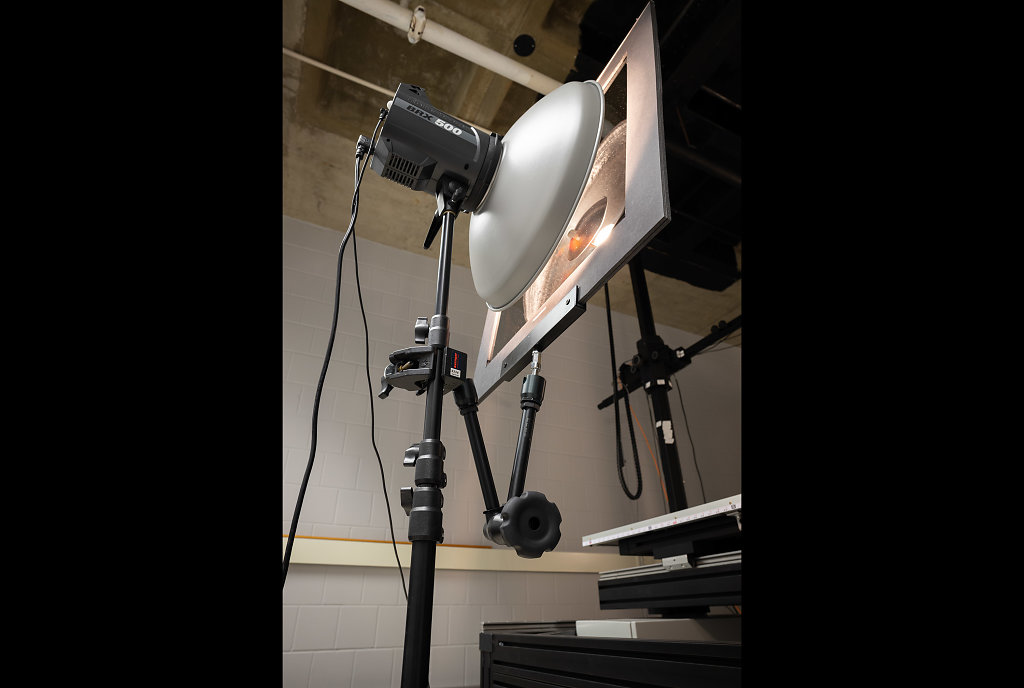
Both sheets are positioned so that their linearities are in the same direction. As a result, the large panoramic photo print on the table can now be illuminated with polarized light in a manipulated way.

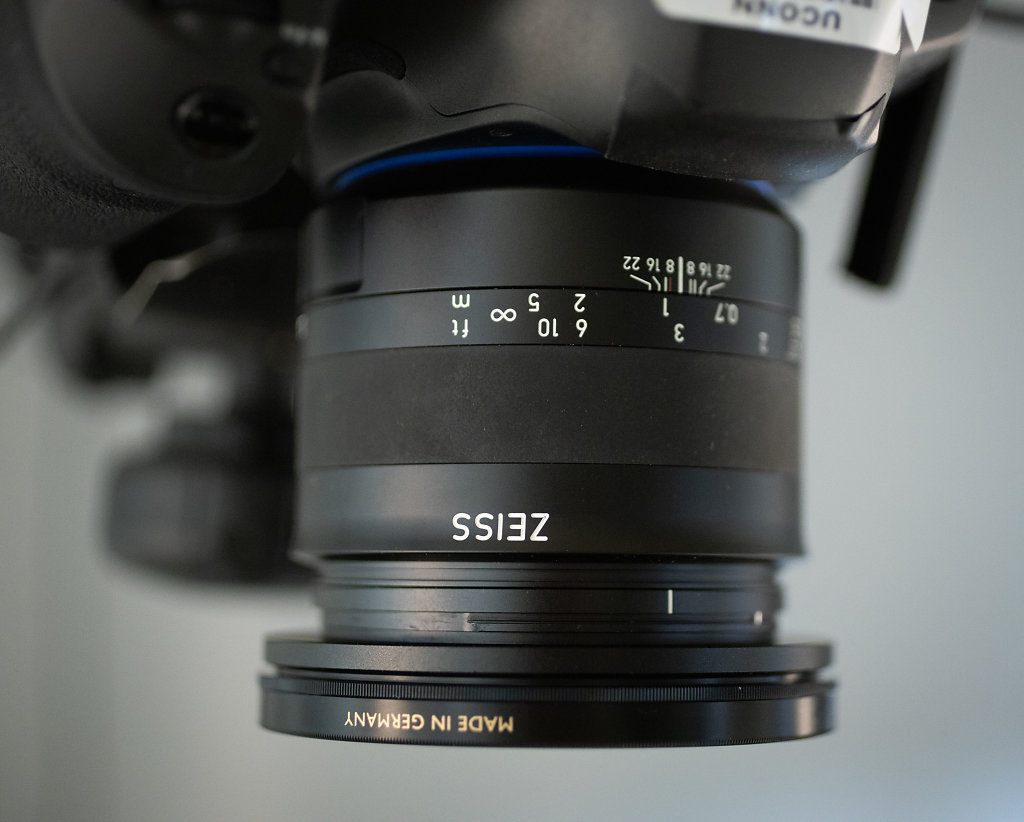
Remember metals primarily produce direct reflections. However, through controlled polarization of the light source, those direct reflections can also be polarized with the same linearity. If we then use a circular polarizer filter on the camera lens and orient its linearity 90 degrees to that of the polarized lights this will produce a nearly complete blockage of directly reflected light known as extinction. In this way, the metallic sheen from silver mirroring can be mitigated during capture.

Zeiss Milvus 50mm f/1.4 Mounted With B+W Circular Polarizer Filter
Cross-Polarization Schematic: Unpolarized White Light = Flash > Polarizer 1 = Polarizer Sheet Film Linearity > Polarizer 2 = Circular Polarizer Filter Linearity > Straight Line = Cross-Polarization Extinction Factor (Click Image for Animation)Source: https://micro.magnet.fsu.edu/primer/java/polarizedlight/filters/index.html

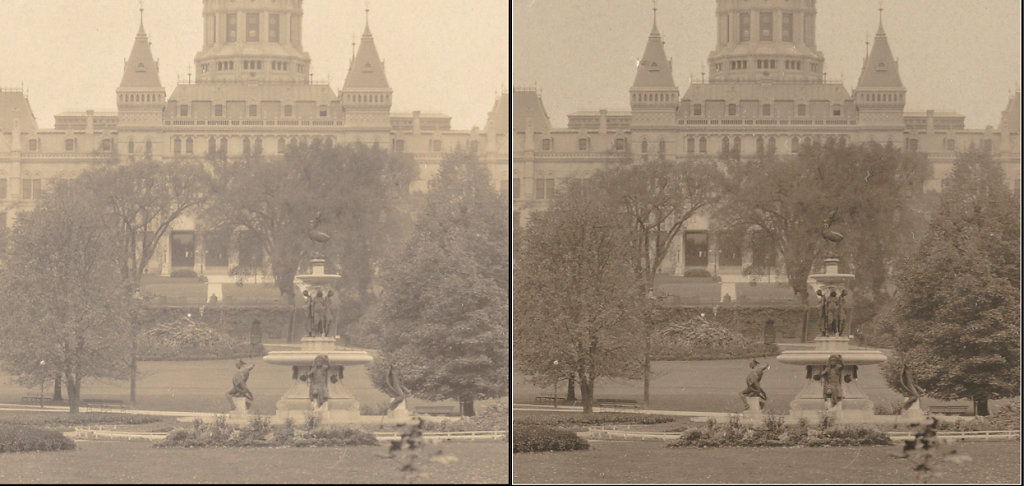
Here are a few examples of the benefits of the technique as illustrated through two panoramic photos that we recently shot in the lab. The first set comes from a 1909 photo of Hartford's Bushnell Park looking towards the Connecticut State Capitol building in the distance...

Bushnell Park and Capitol Building, Hartford, Connecticut. Left Image: No Polarization Filters. Right Image: Cross Polarization Technique Employed.

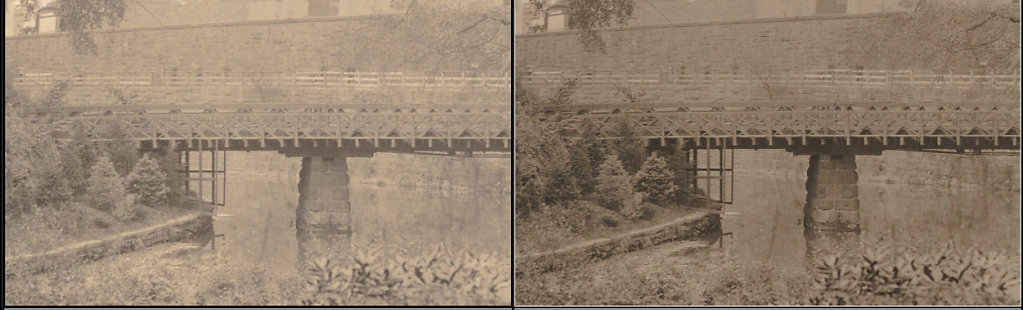
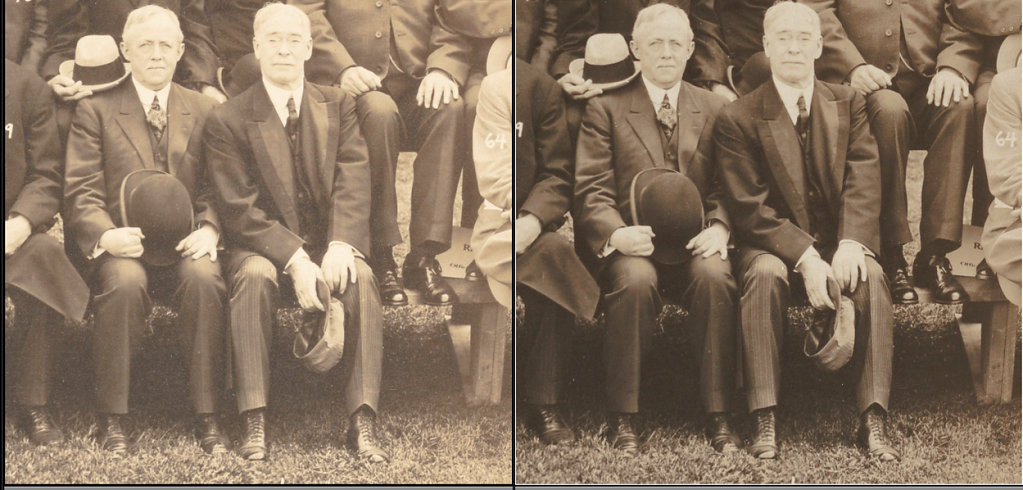
The version on the left was shot with no filtering of either the lights or camera. The cross-polarized version on the right only hints at technique's effect. In turn, here are a couple of 100% zooms that better exemplify the original silver mirroring and its mitigation...

Bushnell Park Detail. Left Image: No Polarization Filters. Right Image: Cross Polarized Technique Employed.
Hartford Capitol Building Detail. Left Image: No Polarization Filters. Right Image: Cross Polarization Technique Employed.
Bushnell Park Detail. Left Image: No Polarization Filters. Right Image: Cross Polarization Technique Employed.

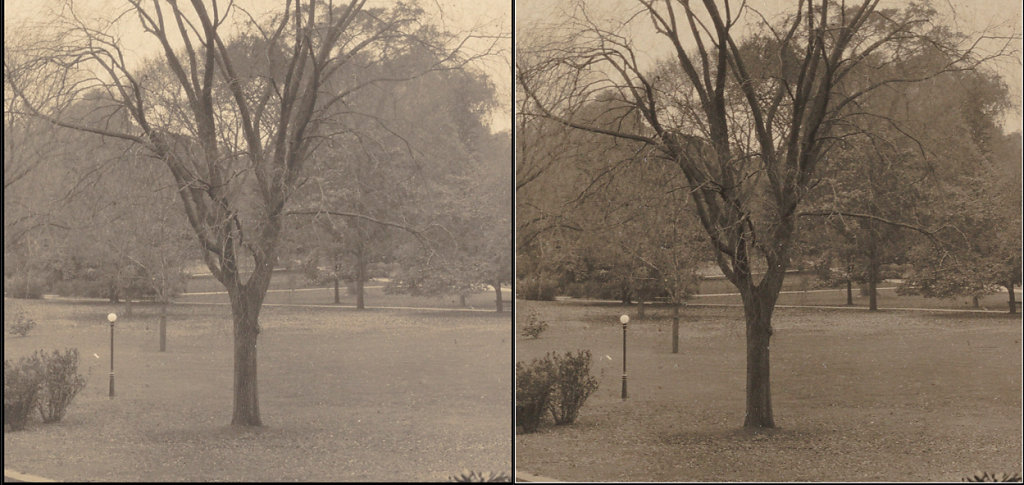
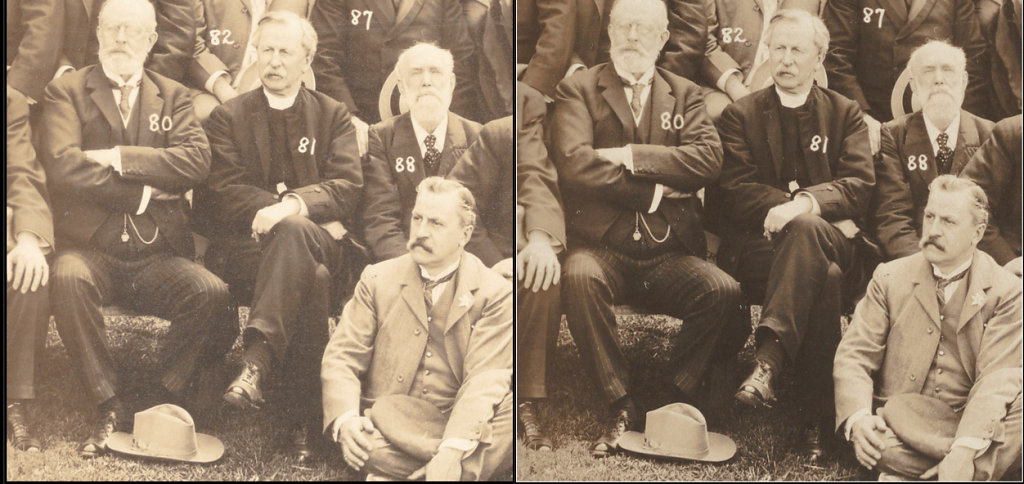
The following group portrait from the UConn Archives' Grabowski Collection also contains areas affected by silver mirroring, though to a lesser degree. Note that the phenomenon's presence is mainly observable in the photo's shadows and darker areas, which are symptomatic traits. Yet even in this somewhat mild case, cross-polarization can clearly help reveal obscured contrast and detail.

Grabowski Collection Panorama. Left Image: No Polarization Filters. Right Image: Cross Polarization Technique Employed.
Grabowski Collection Photograph Detail, Left Image: No Polarization Filters. Right Image: Cross Polarization Technique Employed.

If we return for a moment to the mechanism of cross-polarization and the notion of extinction, questions still remain. What are we seeing in these shots on the right? Why aren't they mostly black?

Up until this point, we've focused on silver mirroring and its ties to the direct reflection properties of metals. However, light reflected from a print is mainly a combination of two components: direct reflection and diffuse reflection. Diffuse reflection is basically light scattered at many angles. Another one of its characteristics is that it is randomly polarized (non-polarized). As a result, cross-polarization has little effect on diffuse reflections.

This variance between the two reflection types allows us to systematically separate them. In essence, cross-polarization can selectively reduce problematic direct reflections (e.g. silver metal) while leaving diffuse reflections mostly alone (non-metallic print surface). As illustrated above, this allows us to digitally capture historical photographs that exhibit silver mirroring with newfound detail.

Sources:

Chen, J.-J. (2001). Documenting Photographs: A Sample Book, Retrieved June 7, 2019, from http://paulmessier.com/pm/pdf/papers/documenting_photographs_chen.pdf

How it Works: Visible Light Linear Polarizer - American Polarizers, Inc. (n.d.). Retrieved June 7, 2019, from https://www.apioptics.com/about-api/resources/visible-light-linear-polarizer/

Hunter, F., Fuqua, P., & Biver, S. (2012). Light--science & magic: an introduction to photographic lighting. Walthan, MA: Focal Press/Elsevier.

Molecular Expressions Microscopy Primer: Light and Color - Polarization of Light: Interactive Java Tutorial. (n.d.). Retrieved June 15, 2019, from https://micro.magnet.fsu.edu/primer/java/polarizedlight/filters/index.html

Müller V. (1995) Polarization-Based Separation of Diffuse and Specular Surface-Reflection. In: Sagerer G., Posch S., Kummert F. (eds) Mustererkennung 1995. Informatik aktuell. Springer, Berlin, Heidelberg

PMG Silver Mirroring - Wiki. (n.d.). Retrieved June 9, 2019, from http://www.conservation-wiki.com/wiki/PMG_Silver_Mirroring

Silver mirroring - Wiki. (n.d.). Retrieved June 9, 2019, from https://www.conservation-wiki.com/wiki/Silver_mirroring Umeyama, S., & Godin, G. (2004).

Separation of diffuse and specular components of surface reflection by use of polarization and statistical analysis of images. IEEE Transactions on Pattern Analysis and Machine Intelligence, 26(5), 639–647. https://doi.org/10.1109/TPAMI.2004.1273960

Weaver, G. (n.d.). Conservation of a gelatin silver print by August Sander. Retrieved June 9, 2019, from https://gawainweaver.com/news/News-conservation-gelatin-silver-print-august-sander/

Share
April 26, 2019

Flex Snakes and Other Things Wild: Photographing Maurice Sendak's Book Dummies

Dummy for ‘Where the Wild Horses Are’ (1955), The Maurice Sendak Collection. Archives & Special Collections at the Thomas J. Dodd Research Center, University of Connecticut Library. © The Maurice Sendak Foundation, Inc.

At the UConn Library Digital Production Lab, my student photographers and I are currently in the midst of digitizing approximately 12,000 pieces of Maurice Sendak's artwork on deposit at the Library's Archives and Special Collections. Among the objects that we've had the pleasure of photographing are a group of Sendak's hand-crafted book dummies. With these pieces, the illustrator worked through a number of preliminary art and design ideas that went towards the creation of his final well-known commercial publications.

Dummy for ‘Where the Wild Things Are’ (1963), The Maurice Sendak Collection. Archives & Special Collections at the Thomas J. Dodd Research Center, University of Connecticut Library. © The Maurice Sendak Foundation, Inc.

Capturing such fragile, miniature books is challenging. Custom supports and careful handling are key elements to a successful shoot. Here's an example of how we staged one of the objects for overhead camera capture:

Camera Stand and Dummy for ‘Where the Wild Things Are’ (1963), The Maurice Sendak Collection. Archives & Special Collections at the Thomas J. Dodd Research Center, University of Connecticut Library. © The Maurice Sendak Foundation, Inc.

In this instance, the verso pages of Where The Wild Things Are are gently held back by a thin archival flex snake. The flex snake is a bit like a nylon tube sock with shot weights inside. In use, one can subtly vary its effect with gentle precision, which makes the tool well-suited for this particular application.

Flattening the recto page is a custom-cut 12”x12” piece of 4.5mm TruVue Optium Acrylic. This light-weight, museum-grade material is easy to handle, scratch-resistant and highly transparent. It is normally used in displaying framed artwork in galleries. Unlike most iron glass, it absorbs little light and imparts a minimal color cast to objects behind it.

Even so, when imaging pieces in the lab using acrylic we batch apply custom white balance values and slightly compensate normal exposure settings in post-processing. Guiding us in these adjustments are data sampled from measurable color targets which are photographed through the same acrylic as the artwork. This, in turn, helps us achieve high-level FADGI image quality metrics in an objective fashion that compare well to normal shots taken without the clear medium.

Custom Support for Shooting Dummy for ‘The Birthday Party’ (1957), The Maurice Sendak Collection. Archives & Special Collections at the Thomas J. Dodd Research Center, University of Connecticut Library. © The Maurice Sendak Foundation, Inc.

For the even smaller and more fragile The Birthday Party dummy we chose to support the front board and recto pages with an angled stack of conservation bag weights. Once again, the flex snake is used to apply resistance to the turned pages, so the verso side can be lightly flattened by acrylic and accurately photographed.

Dummy for ‘The Birthday Party’ (1957), The Maurice Sendak Collection. Archives & Special Collections at the Thomas J. Dodd Research Center, University of Connecticut Library. © The Maurice Sendak Foundation, Inc.

The overall speed of the entire capture workflow is mostly predicated on the individual handling needs of each particular dummy book. So, the effort is necessarily deliberate, slow and careful. In following FADGI 4 star imaging guidelines for spatial resolution of two dimensional art, we're shooting these pieces at 600ppi. What this reveals in the end are the books' finer material details as archival objects, while also casting new light on Sendak's own creative process.

Share
January 16, 2019

Night Visions Through The Canon EOS R

Benton Courtyard Statuary

I recently picked up a new Canon EOS R camera. It's my first experience with a full-frame mirrorless system, so admittedly I'm a little late to the party that has been led up to this point by manufacturers other than Canon. However, now after a couple of months of hands-on use in the field I can confidently join the rising chorus and say that this feels like an irreversible step forward in camera technology. Among a number of novel attributes, I'd like to touch on one of the EOS R's more salient mirrorless features that I've really grown fond of.

After owning the original Canon 5D, followed over time by the Mark II and III, I decided to skip the fourth iteration of this solid line and make the leap from a camera body with an optical viewfinder to one with an electronic viewfinder or EVF. In short the EOS R's viewfinder is killer. Beyond a number of other systemic enhancements that the mirrorless system affords in terms of autofocus point coverage and accuracy, the EVF grants one a live view of the soon-to-be-exposed scene based upon the camera's current shutter speed, aperture, and ISO settings. What this translates into among other things is the ability to compose and shoot in extremely low light. The viewfinder no longer simply acts as a mirrored reflection of the world in front of you but instead offers a depiction of how the camera sensor is capturing and interpreting light coming through the lens. As a result, what the EVF displays is an accurate representation of how an image will eventually be exposed once the shutter is triggered. This gives the photographer detailed real-time visual feedback and compositional control before a shot is fired. And because the sensor's signal can be amplified through higher ISO settings, and the EVF seamlessly reacts to such changes, the effect is something akin to night vision when the system is paired with fast glass.

Along with the image above, here are a few additional shots from a week ago that I took while walking across campus on my way home for the day. A steady mist was falling, and heavy fog blanketed the evening. Normally these are tough conditions to grab critical focus and to dial in a decent, balanced exposure. The camera, however, easily excelled in both regards through my use of the EVF while simultaneously toggling a few control dials all within easy reach. No need to fire, slowly chimp the shot, adjust focus or exposure, and then re-compose.  Instead, I was handling a tool that was really working with me as I was moving and seeing.

Benton Courtyard Bench

Because I like to selectively push and pull tones in post for creative effect, particularly when working in black and white, some of the resulting shadow regions in these processed shots were intentionally clipped in areas.  However, when I initially brought the images into Lightroom for editing, I was pleased to note that the camera raw files had ample dynamic range to work with.  This was particularly appreciated in images such as these night shots which contained both very bright highlights and deep shadows.  Is the EOS R's available dynamic range as broad as that found in medium format digital camera systems or even other DSLR competitors?  Most likely not.  But it is certainly usable.

Tree Near Gulley Hall

In summary, my early experiences in using a mirrorless system have fostered a growing sense that I'm peering into photography's future.  So far I like what I'm seeing.

Oak At Wilbur Cross
View all blog by month
  • Home
  • Galleries
  • Blog
  • Bio
© Michael J. Bennett